


Make your 3d modelling process uncomplicated with some useful tips
An exclusive article by Matt Donley - Owner of www.mastersketchup.com
Are you a Sketchup noob, looking to jump right in and start creating amazing 3D models? Before you skim over the help menu or spend hours watching video tutorials, learn these few tips and you’ll be modeling in no time.
Most people know that Sketchup has the reputation of being the easiest way to learn 3D modeling. So easy, in fact, that a lot of people (including myself) jump right in without reading any sort of manual or help file and try to start modeling. We just choose a tool by looking at the icon and guessing at what it actually does.
Hmmm, this rectangle looking thing must create a rectangle… Clicking on the screen, you quickly discover how to draw something. Woo hoo! You then click on the button with the red arrow on it (push/pull) and extrude your first 3D shape in Sketchup...
To be able to jump right into a program like this and actually be successful at creating something is an incredible accomplishment for the developers who create and maintain Sketchup. But I’ve discovered that there are a lot of people out there who start out with Sketchup, but never take the next step and learn a few tricks that keep them on the right track. They quickly become frustrated when things don’t act the way we expect them to in Sketchup. We learn bad habits, or we spend so much time doing things that are actually really simple once you know a few tips.
I was one of those people. For the longest time, I didn’t know about groups or components. I just drew everything “out in the wild” and everything stuck to each other. It was a mess. If I ever needed to make any changes, the whole model would get screwed up. But eventually, I learned a couple things that I wish someone had told me when I had first started with Sketchup.
In this post, I wanted to give you my list of the things that EVERY Sketchup modeler should know and use. If you practice all of these tricks, you will prevent a lot of frustration and anguish.
1. Use a 3-Button Mouse To Navigate
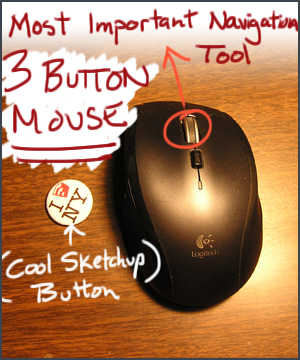
Don’t even think about clicking on the orbit or zoom button on the toolbar. You need to use a 3 button mouse to navigate in Sketchup. Although, John Bacus blew my mind at MakerFaire 2012 where I witnessed him navigating flawlessly in Sketchup using his MacBook trackpad.
The middle scroll wheel on your mouse is actually a button too! If you click it and hold it down, Sketchup will temporarily activate the orbit tool. This will this save you a ton of time by not having to go back and forth activating the orbit tool by clicking the toolbar. The best part is that the middle mouse button only temporarily activates the orbit tool. This means you could be in the middle of drawing a rectangle, hold the middle mouse button to orbit around for a better perspective, then finish the rectangle once you’re done orbiting. This works while using ANY tool.
2. Use Groups and Components
Do you want your model to be organized? Do you want the ability to hide different “parts” of your model so you can work on other things that may be hidden behind something? Do you want to retain the ability to make changes to parts of your model without screwing up the rest of it? If you answered yes to all of these, you should be using groups and components. If not, you should still be using groups and components! I can’t stress this enough. This is my Number 1 recommendation to anyone using Sketchup. Start using groups and components as soon as possible.
Groups isolate parts of your geometry, and protect them from one another. It allows you to manipulate and move a collection of geometry, rather than having to select each piece individually. You can also create groups within groups. Using the Outliner Window, you get an organized hierarchy of your model geometry, allowing you to stay organized while you’re modeling.
To create a group, select multiple entities, right click, and select “Make Group.” To make a component, select “Make Component” instead. Components allow you to create identical copies of something. If you make changes to one instance of a component, all the other instances of that component change as well.
3. Making Multiple Copies
Most people are used to the idea of using copy/paste, or CTRL + C and CTRL + V for the same effect. Although you can do that in Sketchup, that’s not the best way to move or copy something.
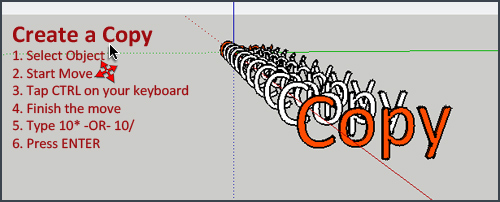
First, select the object you wish to copy. (Make sure it’s in a group, see # 2).Then, with the Move Tool, click once to start the move. Then, tap the CTRL button on your keyboard. This tells Sketchup you want to make a copy. Move it a specified distance from the original by typing that distance on your keyboard and pressing enter.
For multiple copies, equally spaced apart, tell Sketchup how many copies you want. Press 10* ENTER to make ten copies spaced apart the same distance as the original copy. Or press /10 to create 10 copies in between the original copy.
4. Lock Axis With Arrow keys
When you’re trying to draw a line or move something, it’s sometimes hard to get it to move in the direction you want. But just by tapping one of the arrow keys on your keyboard while you’re moving, you’ll lock the object to an axis. Up arrow is the blue axis, left arrow is the green axis, and right arrow is the red axis.
TIP: You can also you the SHIFT key while aligned to an axis to lock it to that axis. Locking the axis also allows you to reference other points in your model to align your object to.
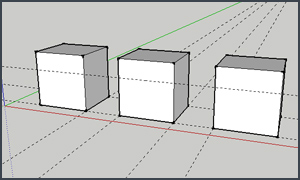
5. Use multiple steps for complex moves
If you’re trying to move an object “down and to the right, and a little bit towards the back”, it’s sometimes hard to get Sketchup to understand where exactly you’re trying to move it to. One trick that really helps is to just think of the move one axis at a time.
First, get the height positioned properly. Lock the object to the blue axis, and reference another point or define a set distance. Next, align the green axis and move the object, then finally the red axis. Doing it in three separate steps allows you to precisely position an object within your model without having to align multiple axes at the same time.
6. Select multiple entities
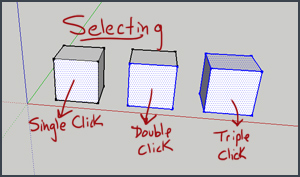
With the Select Tool, if you click on a face, it will become selected. If you want to select a face and it’s connected edges, just double click it. To select all connected entities of that object, triple click it. Whenever you are creating a new group, you’ll want to triple click to select all connected geometry. Remember that if you are trying to select something that’s within a group, you need to double click the group to open it first.
TIP: You can also select multiple entities by dragging a selection box around the parts you want to select.
7. Create Guides with the Tape Measure Tool
Quickly after creating a few basic models in Sketchup, you’ll want to start creating things that have specific dimensions. One way to reference specific points in space is to create guides. To create a guide, clicking on an edge (not a point) with the Tape Measure tool. Drag your mouse out along the axis you’d like to create the guide. Remember you can lock an axis using the arrow keys… Type in the distance you’d like the guide to be from the original edge.
Sketchup will now reference that guide when you hover close to it. You can create multiple guides adjacent to each other to reference their intersection.
8. Don’t click the Value Control Box (VCB)
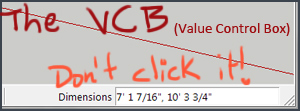
There’s a box on the bottom right corner of the Sketchup window that shows you dimensions as you are working with different tools. Many people have a tendency to think that this is some sort of command prompt that you can click in to type a dimension. It’s not. It just shows the output of different dimensions as you work with them in Sketchup.
I know it’s confusing because sometimes I’ll even tell people “Type in your dimension in the VCB”, which technically isn’t accurate. So here’s what it does; If you draw a rectangle, you’ll see the size of the rectangle show up in the VCB, actively changing as you stretch the rectangle. It’s telling you how big the rectangle is as you make it. Once you complete the rectangle, you can define your own dimensions, you don’t even need to click anything, just type it in. ex. 4',58" ENTER.
The VCB will show you the values as you type them in, you don’t need to click it. So just think of the VCB as showing you the dimensions of whatever is actively being done. If you’re creating entities, it will tell you their size. If you’re typing in dimensions, it will tell you those dimensions.
Tip: If you made a mistake the first time you typed in dimensions, no biggie. Just type in another set of dimensions and Sketchup will resize it. But once you’ve moved on to another tool, you’ll have to resort to the manipulation tools for any further tweaking. ![]()
9. Reference other points in your model
You can reference other parts of your model in order to align two objects. Let’s say you have a chair and a table in your model. You want the bottom of the table and the chair to be aligned on the same plane. So you would select the chair first, then grab the move tool. Reference the bottom of the chair to start the move, then lock to the blue axis (Hit the up arrow to lock the blue axis), then move the mouse over to the bottom of the table to finish. This aligns both objects on the blue axis in relationship to each point you referenced to start and end the move.
10. Use Keyboard Shortcuts

As a beginner, you may be intimidated at the thought of having to memorize anything. But the thing is, you switch tools so frequently in Sketchup that it’s so easy to remember them once you start using them. It’s just a matter of getting started. Using keyboard shortcuts saves a tremendous amount of time in Sketchup. Your modeling will begin to feel so much more natural, you won’t even have to think about it.
- Profile Builder (Pro)
- Sketchup vray tutorials
- SteelSketch for sketchup
- 3d Sketchup Render Section
- 2015 Click-Change Plugin
- V-Ray 2.0 for Sketchup
- 3d sketchup components of plants
- Revizto 3.0 for Sketchup
- Modelur for sketchup
- Animation in Sketchup
- Sketchup parametric urban design
- SimLab 3D PDF exporter 3.1
- Sketchup full frame wood 2.0
- Easysketch Sketchup Plugin
- Instant Roof Nui Plugin
- Scene Generator Plugin
- Maxwell Render Suite 3
- SketchUp Instant Wall Plugin
- LightUp version 3.3
- Curtain Wall Plugin
- Instant Fence and Railing Plugin
- Plug-in Raylectron v3
- SimLab SketchUp exporter
- Tilelook Sketchp Plugin
- Solar Energy Design Plugin
- IES VE SketchUp plugin
- DropGC plugin for Sketchup
- Vue Exporter Plugin V10.0
- MoveAlong 1.0 for SketchUp
- [Re]Scene plugin
- 3D Tree Maker v1.10.07
- LightUp for SketchUp
- Advanced Camera Tools for SketchUp
- TIG-PointUp Plugin
- Outdoor-stair Plugin
- CutNFill Plugin for Sketchup
- [SU]Ch plugin for sketchup
