Get SketchUp Image Without Plugins or Software
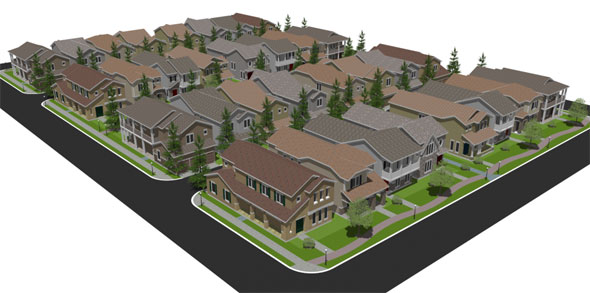
The imaginary presentation of SketchUp is important. It is actually the major point of modeling. A designer will get various options, he/she could find out how to be develop into an outstanding designer and 3D modeler with our sketchup tutorials, but chances are that need to know how to get awesome sketchup images as well. In this session, you will learn how to get beautiful images out of sketchup without using those costly rendering plugging, additional software, or other post-production techniques.
Towards Photo-Realistic Sketchup Images : We are not going to be able to generate a photorealistic rendering with sketchup alone, but we can certainly move towards it. To start off, make sure you are viewing in perspective. To enable perspective go to the Camera tab and check Perspective.
A viewpoint is similar to how you would see your model if you were viewing it with the naked eye. Tip: If you select the zoom tool, you can then type in a degree. This degree is the field of view. Depending on what degree you choose it will exaggerate or play down the perspective.
Sketchup Edges : I am a big advocate of the thought that a successful image does not scream the aesthetic of the program it came from. I cannot quite put my finger on what makes so many sketchup images so readily identifiable, but I know it has something to do with the edges and flat faces. That is a great aesthetic for communicating early concepts, but when it comes to presentation, it can become distracting. I uncheck Edges from View>Edge Style to avoid the identifiable SketchUp look. Instead, to define shapes and create depth within my model I enable View>Shadows.
The Kind of Shadows : Not all shadows were created equal. It is important to take into account the kinds of shadows being cast by the positioning of the sun. For this image, I wanted the shadows to highlight the depth of the houses, but not be too dramatic. I chose a summer month where the sun (the altitude) was highest in the sky so that the shadows would be shorter. If you are looking for long dramatic shadows use a winter month. I then played with the time of day slider to get the sun to light up the sides of the buildings facing the camera.
Reload it : The original trees and shrubs in this model were flat (literally). I searched through the 3d warehouse for high-quality, low-poly, 3d foliage and saved them to my desktop. In my model, I right clicked on one of the components I wanted to replace and selected Reload from the menu. From the pop-up window, you can navigate to your saved components. Once you find them, you can load them into your model and they will replace every instance of the component you just selected to reload.
Last but Not Least : Lastly, your view is incredibly important. You can see that earlier image of this town did not really convey the quality of space. That view of the houses is mostly of the roofs. A lower angle helps to show off more of the architecture, which gives the image more character.
The Extra Mile : If you are still looking for more, a great way to pump up your images is to add entourage. That is… add in people, cars, mailboxes, telephone poles, street lights, stop signs etc. Create a narrative with your image. What does a snapshot of this place look like? Just be careful not to let your file size get too big. Only add in components that you will see from your vantage point and select high-quality, low-poly models from the 3D warehouse to use.
Image Courtesy
DesignerHacks
www.designerhacks.com

- V-Ray for Sketchup
- LumenRT LiveCubes from Sketchup
- Penggunaan Ivy Plugin
- 3d Sketchup Render Section
- Plugins in Sketchup 2013
- Kitchen Designing with Sketchup
- Skalp for SketchUp
- Land F/X Sketchup Plugin
- Sketchup ETFE modeling
- Section Cut Face Plugin
- NPR perspective in SketchUp
- 7 most striking features of Sketchup 2014
- Array along path in Sketchup
- Component with Sketchup
- OctaneRender for SketchUp
- Auto eye Plugin for Sketchup
- Layers and Scenes with sketchup
- Drawing roof in Sketchup
- Watermarks to a sketchup model
- Realistic looking grass in sketchup
- Drawing in sketchup
- Materials in v-ray for sketchup
- Animation in Sketchup and Enscape 3D
- Dome light & HDRI feature in v-ray
- Exterior lighting with vray
- Photo-realistic render in sketchup
- Trimble Site Contractor SketchUp
- Ten most powerful sketchup plugins
- 3d model with Sketchup
- Realistic grass through Vray Fur
- Tiny house with Sketchup
- Vray 2.0 for Sketchup 2015
- Trimble MEPdesigner for SketchUp
- Thea Render Plugin for Sketchup


